
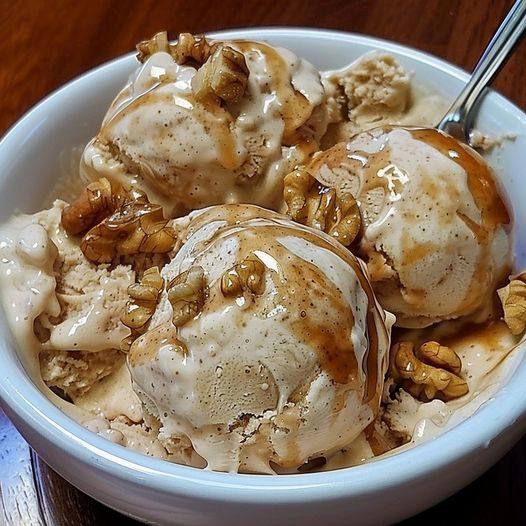
Maple Walnut Ice Cream 🍁🍨
(Creamy, Nutty & Naturally Sweetened)
There’s something timeless and comforting about Maple Walnut Ice Cream. The deep, caramel-like sweetness of pure maple syrup combined with crunchy toasted walnuts creates a dessert that feels classic, cozy, and indulgent—yet can be made completely plant-based at home.
This homemade version is luxuriously creamy without dairy, using simple ingredients that let the natural flavors shine. Whether served in a cone, bowl, or alongside warm desserts, this ice cream is pure comfort in every scoop.
Why You’ll Love This Maple Walnut Ice Cream
-
100% vegan & dairy-free
-
Naturally sweetened with maple syrup
-
Rich, creamy texture without eggs
-
Crunchy toasted walnuts in every bite
-
Easy to make with or without an ice cream maker
-
Perfect year-round, not just in summer
It’s a nostalgic flavor made modern and plant-based.
Ingredients You’ll Need
Ice Cream Base:
-
1 can (400 ml) full-fat coconut milk
-
1 cup cashew cream (soaked & blended cashews)
-
1/2 cup pure maple syrup
-
1 tsp vanilla extract
-
Pinch of salt
Walnut Mix-In:
-
3/4 cup walnuts, roughly chopped
-
1 tbsp maple syrup
-
1/2 tsp cinnamon (optional)
Step-by-Step Instructions
1. Toast the Walnuts
In a pan over medium heat, toast walnuts with 1 tbsp maple syrup and cinnamon (if using) for 3–4 minutes until fragrant and lightly caramelized. Set aside to cool.
2. Prepare the Ice Cream Base
In a blender, combine coconut milk, cashew cream, maple syrup, vanilla extract, and salt. Blend until completely smooth and creamy.
3. Chill the Mixture
Refrigerate the mixture for at least 2 hours. This step helps improve texture.
4. Churn or Freeze
-
Ice Cream Maker: Churn according to manufacturer instructions. Add walnuts during the last few minutes.
-
No-Churn Method: Pour mixture into a freezer-safe container. Freeze for 45 minutes, stir well, and repeat 3–4 times. Fold in walnuts halfway through.
5. Freeze Until Set
Freeze for 4–6 hours or until scoopable.
Serving Suggestions
-
Serve in cones or bowls
-
Pair with warm apple pie or brownies
-
Drizzle with extra maple syrup
-
Sprinkle with crushed walnuts
-
Add vegan caramel sauce for extra indulgence
Storage Tips
-
Freezer: Store in an airtight container for up to 2 weeks
-
Let sit at room temperature for 5–10 minutes before scooping
-
Cover with parchment to prevent ice crystals
Health Benefits
Maple syrup provides natural minerals and antioxidants, while walnuts are rich in omega-3 fatty acids and healthy fats. Compared to store-bought ice cream, this version contains no preservatives or artificial flavors.
Recipe Variations
-
Sugar-Free: Use sugar-free maple-flavored syrup
-
Extra Creamy: Add 1 tbsp coconut oil
-
Maple Pecan: Swap walnuts for pecans
-
Protein Boost: Add vegan protein powder
-
Cinnamon Maple: Increase cinnamon for warmth
Final Thoughts
This Maple Walnut Ice Cream 🍁🍨 is creamy, comforting, and deeply satisfying. With its rich maple flavor and crunchy walnuts, it’s a dessert that feels both nostalgic and elevated—perfect for cozy nights or special occasions.
Once you make it at home, store-bought ice cream won’t compare.